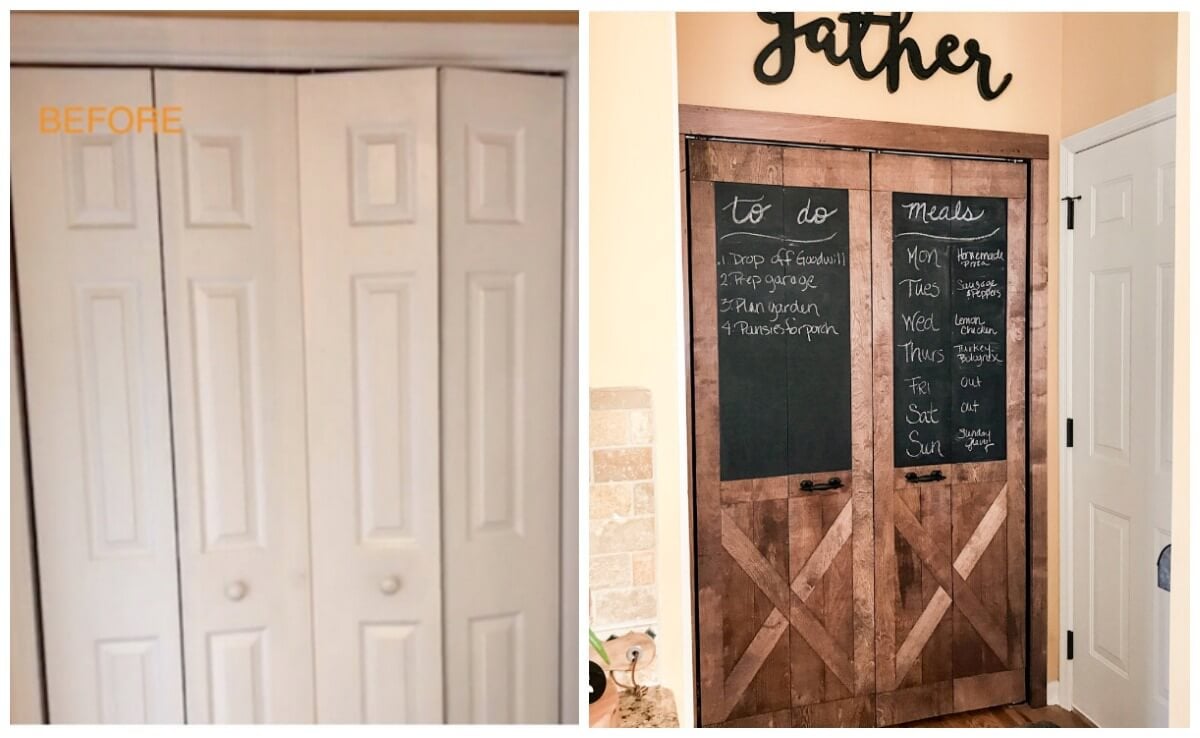
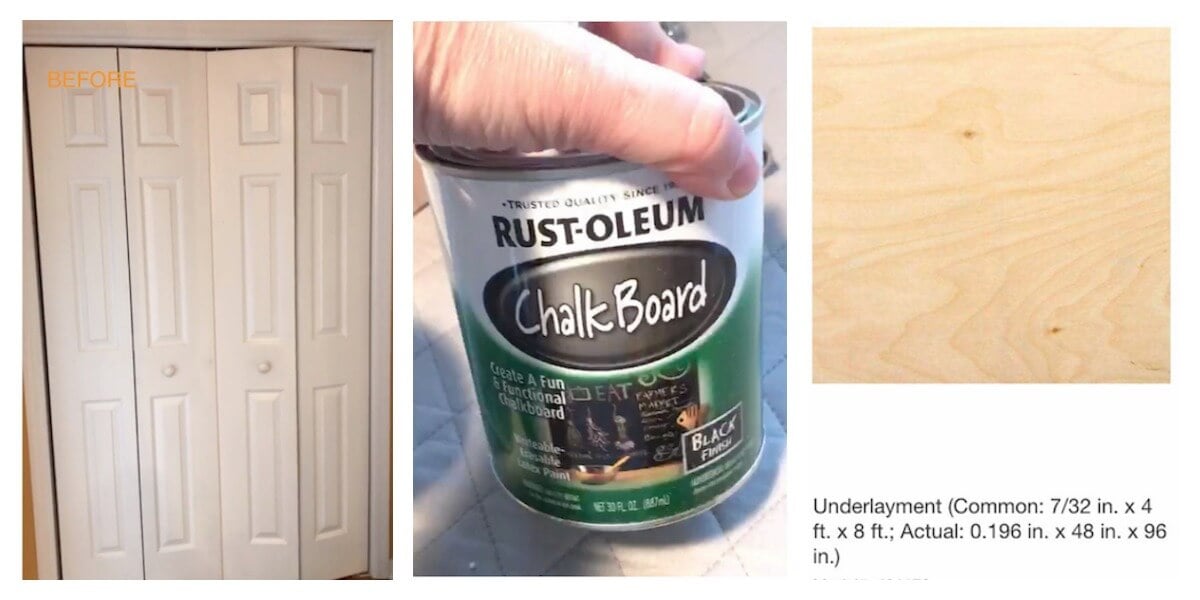
Most of us have those stark white, builder grade, closet doors in our homes, including me. They are in most of my bedrooms but I also have them in my kitchen area. With my kitchen being so open to the rest of the house, these doors were, were just screaming to have something special done to them. I considered painting them a rich, dark color but I felt that would have stood out like a sore thumb. That’s when I decided to turn them into barn doors.
Closet Door Ideas –
With the price of real barn doors way out of my budget, I decided on a much more budget friendly way to attack the project. So, instead of completely replacing the door, Pat and I layered the doors to make them appear to be real barn doors.
The process was actually pretty easy to do. The hardest part was calculating everything. The good thing for you is, I am breaking the entire process down for you so you can try it as well.
What You Need:
- White Bi-Fold Doors that need an update
- 2 Sheets of Underlayment – 4ftx8ft
- Liquid Nails
- Finishing Nails
- Stain
- Chalkboard Paint
The Plans:
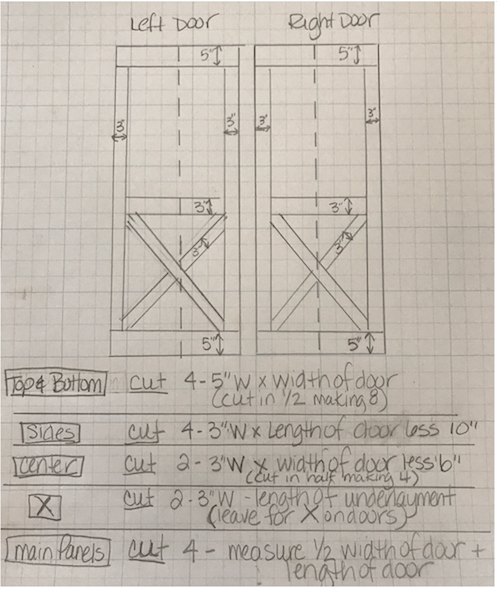
These are my plans and what I did for my doors. You will have to measure your door to make sure the measurements are the same. If they aren’t the same, just adjust the plans to fit your door.
- Cut the pieces for the Main Panels: (4) pieces measured 1/2 the width of the door x the length of the door
- Cut the pieces that would lay on the top and bottom: (4) 5″W pieces (width of door) – Cut them in half so you have 8 (they need to be cut in half for the bifold door)
- Cut the pieces that would lay on the sides: (4) 3″W pieces – Cut these the length of the door but subtract 10″ (they need to fit between the top and bottom pieces)
- Cut the pieces that would lay in the center: (2) 3″W pieces – Cut these the width of the door but subtract 6″ (they need to fit between the 2 side pieces)
- Cut the pieces that make the 2 X’s : (2) 3″W pieces – length of the under layment (don’t cut to exact until you are done putting all the above pieces together on the door)
How to Put It Together:
- Paint the existing door a dark color including the sides, the back and in between the doors (when the door is folded open). We painted it brown. This is to insure you don’t see any white peaking through the wood you install on top. Painting the sides, back and in between the doors is important because they will be seen when you open the doors.
- Lay all your pieces (except the X) out on your doors to be sure they fit well and are cut properly.
- Stain your cut pieces of plywood before you glue them down. If you want to make the top part a chalk board, then paint the top with chalk board paint and stain the bottom half. Your line between the chalk and stain does not need to be perfect as there will be a piece of wood covering it.
- Lay the Main Panels down on the Doors in 4 panels and attach to your door with liquid nails. Make sure you chalk board part is at the top of the door and the stained part is at the bottom.
- Lay the top and bottom and attach with liquid nails
- Lay the sides down and attach with liquid nails
- Lay the center pieces down and attach with liquid nails
- Put the X down and nail with liquid nails
- Now you can cut your pieces for the X. One side of the X will be a full piece of wood and the other side with be split on either side of the first piece.
- Put Finish Nails around the door. These are not needed as the liquid nails is pretty strong but it does secure it more and gives it an authentic barn door look.
- Attach handles.
We wound up taking off the old, basic, white trim and added 1×3 pine around the door frame stained in the same color as the door. It really finished off the project.
Total cost for this project was less than $80 so I’d say this was a huge money saver for us and I couldn’t be more happy with the results. They really make such a difference in the kitchen space.
Let me know if you have any questions and I’ll try to answer them in the comments below. If you would like to see videos of how we did it, we shared it on my Instagram page, @livingrichwithcoupons. Look under the icon highlights on my profile under DIY.